


"Eventually you're going to need to know how to remove window tint because, with age, your tint will start to deteriorate.
Two of the most common symptoms of dying film are the dreaded "purple film" and the "bubbling film". The purple film is a product of the non-metallic dyes within the film breaking down. Bubbling underneath the tint film is a sign that the window tints adhesive is failing.
A sign to look out for is if just one bubble appears, you will know for certain that shortly your window tint will be overcome with air bubbles. Attempting to remove the window tint simply by peeling is NOT reccommended, as if you do, you'll be left with a whole lot of sticky residue left on your window - which will take hours to carefully scrape off.
Here is how you can prevent this from happening.
Two of the most common symptoms of dying film are the dreaded "purple film" and the "bubbling film". The purple film is a product of the non-metallic dyes within the film breaking down. Bubbling underneath the tint film is a sign that the window tints adhesive is failing.
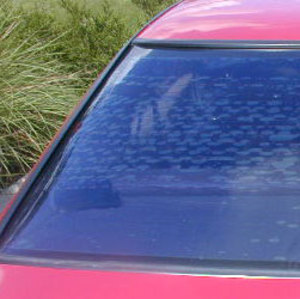 |
| Window tint bubbles in rear of car. |
A sign to look out for is if just one bubble appears, you will know for certain that shortly your window tint will be overcome with air bubbles. Attempting to remove the window tint simply by peeling is NOT reccommended, as if you do, you'll be left with a whole lot of sticky residue left on your window - which will take hours to carefully scrape off.
Here is how you can prevent this from happening.
 How to Remove Window Tint - Things You'll Need
- Glass/Window Cleaner
- Ammonia (undiluted)
- Very fine steel wool
- Sharp Knife or Razor Blad
- Black Trash Bags
- Hair Dryer or Steamer (only for the steaming method)
 How to Remove Window Tint - Warnings
- There is a chance you'll permanently damage defroster lines in the rear window (and perhaps the radio antenna, if it is made out of the same material).
- If you are not careful with the razor blade you can cut yourself or scratch the window.
How to Remove Window Tint - Sun and Ammonia Method
The technique below requires sunlight. If you live in an area with little to no sunlight, or you think the sun won't be able to sufficiently heat your back window, look at the other window tint removal options below.- Roughly cut two black garbage bags into the shape of your window. Spray the outside of your window with soapy water, then cover it with one of the black trash bags. Smooth out the plastic, try to leave no bubbles or pockets of air.
- Protect all inside surfaces near the window with a tarp: speakers, rear light, and upholstered surfaces, then spray the entire window film with undiluted ammonia. Undiluted ammonia has a strong smell. It is recommended that you hold your breath or wear a face mask. Ammonia fumes can be harmful and different individuals will respond differently to exposure to the fumes.
- While the ammonia is still wet, trap the ammonia against the window tint with your other trash bag or plastic wrap. Park your car with the window with the tint you're trying to remove facing the sun for an hour or so, to soften the tint's adhesive. You can accelarate the process with the hairdryer, just set it to high temperature and high fan speed and heat all the window thoroughly. Be careful though, as you're heating much quicker then just the sun, you'll need to add more moisture. Most window tint is constructed of multiple layers of film. When left under the hot sun, the black garbage bags will absorb the heat, helping the window tin film to peel off in one piece.
- Begin to peel of the tint film. You can use your fingernails or a razor to start peeling off the film from the corner of the window. Be careful not to cut the defroster lines. Keep spraying with the ammonia to keep the film moiseter. Use a razor blade to scrape off any of the leftover tint.
- Remove any residual adhesive with ammonia and very fine steel wool (if it's too coarse it can scratch your glass or break your defroster/antenna lines), then wipe the surface with a cloth or paper towel before it dries. Remove the exterior trash bag, and clean the window thoroughly with glass cleaner.
How to Remove Window Tint - Heat Method
If it's not sunny or hot enough, or you would rather not to mess with razor blades and ammonia, you can use a clothing steamer (approx. US$20 -30) instead to ready the tint for peeling. You can also use a hair dryer or heat gun, but be conservative. It will produce more heat than the steamer.- Steam a corner of tint, holding the steamer 1/2-2\" (1.25-5cm) away from it, until you can pick it off with your fingernail.
- Peel and steam at the same time, loosening the glue with the steam right before you peel. Peel slowly. If you pull too hard, you may break the tint or worse, peel off the top layer of the tint, leaving the difficult and sticky adhesive layer behind.
- Wipe off remaining glue with a towel. Press hard so that the glue sticks to the towel, rather than balling up or smearing. Steaming the glue before wiping can help.
- Clean the window thoroughly with glass cleaner.
How to Remove Window Tint - Soaking and Scraping Method
If you're unable to use the other methods, or if there is a small area of tint, this method can be used (although it is time-consuming).- Make a small cut in the film with a razor blade, creating a tab which you can pull.
- Peel the tint. It won't come off neatly; you may find it tearing or separating into several pieces.
- Spray the adhesive with soapy water.
- Scrape the adhesive off with the razor blade. Be sure to get it all.
- Clean the window thoroughly with glass cleaner.
How to Remove Window Tint - Duct tape method
If the first layer comes off and leaves the second layer, use Duck Tape (name brand with strong adhesive) to remove the second layer. |
| No 'Ducks' were harmed in the making of this product |
- Apply the tape in rows, overlapping by an inch or so over the purple film.
- Leave the tape on the window in the sun for an hour or two so the tape adheres to the film
- Remove the tape. The film should lift off with the tape. Try a small area to test the amount of time needed for the sun to heat up the tape.
- If the test strip doesn't work the first time, leave tape on a little longer to allow the glue on the tape to adhere to the film.
- Use ammonia or 409 and a dish scrubber to remove the glue.
 Tips
Tips
- When scraping with the razor blade, you may find it becoming blunt. You'll probably need several to get the job done.
- When removing tint film that's near defroster (or antenna) lines, use duct tape to lift the film instead of scraping with the razor blade. If there's sticky residue, use ammonia or Windex to remove it with an old towel.
- Try a heat lamp or flood lamp (such as a 500W painter's lamp) for heat, instead. Keep the lamp about 12-18 inches from the outside of the glass. Keep the tint side wet with the ammonia and covered with the plastic sheet while heating it with the lamp. Heat it for 30-45 minutes and try to get the tint to come off in one piece. The residual glue can usually be scraped with a non-carbon steel razor blade while keeping it wet with warm, soapy water.


